
Table of Contents
1.Why This Article Is Worth Your 3 Minutes
When brands start thinking about creating their own unique bottle, the first question is always:
“How much does mold development cost?”
But in reality, the real concerns are usually these:
Why do some molds cost a few hundred dollars while others run into thousands?
What exactly happens during the mold development process?
And most importantly — how do I avoid delays and hidden costs?
Most online explanations are either too technical or too vague, and supplier answers often oversimplify the process.
This article breaks everything down in a way that’s practical and easy to understand — what you’re really paying for, how the workflow works, where the risks are, and whether mold development even makes sense for your brand right now.
2.How Much Does Mold Development Actually Cost?
| Mold Type | Difficulty | Price Range (USD) | Explanation |
|---|---|---|---|
| Injection mold (caps, pumps, bottle parts) | Simple | $400 – $1,100 | Basic parts with simple structure |
| Medium | $1,100 – $3,000 | Common cosmetic components | |
| Complex | $3,000 – $7,000+ | Multi-part, sliding cores, dual-structure | |
| Blow mold (PET/PE bottles) | Medium | $800 – $2,000 | Standard PET/PE bottles |
| Complex | $2,000 – $4,500+ | Thick-wall, special shapes | |
| Acrylic / AS molds | Mid-high | $3,000 – $7,000+ | Requires high clarity and precision |
| Pump molds (most complex) | High | $7,000 – $20,000+ | Many components & tight tolerance |
| Full bottle set (cap + overshell + bottle + inner) | High | $10,000 – $40,000+ | For premium, exclusive designs |
3.What Makes Up the Mold Cost? (Why Prices Vary So Much)
| Cost Item | Meaning | Why It Matters |
|---|---|---|
| Engineering & 3D design | Wall thickness, draft angle, mold flow | Determines whether the mold works smoothly |
| Steel material | Types like 45#, S136, NAK | Better steel = longer mold life & higher precision |
| CNC machining time | The actual cutting & forming | More complex parts = more hours = higher cost |
| Cavity count | Single vs multi-cavity | Multi-cavity increases speed but raises cost |
| Slider / lifter | Solves undercuts & complex shapes | Every slider adds major cost |
| Trial runs (T0/T1/T2) | Iterations to refine size & fit | Each round requires tuning, testing, adjusting |
| Machine debugging | Fine-tuning size, fit, threads | More precision = more time needed |
| Maintenance & fixing | Post-production adjustments | Impacts stability during mass production |
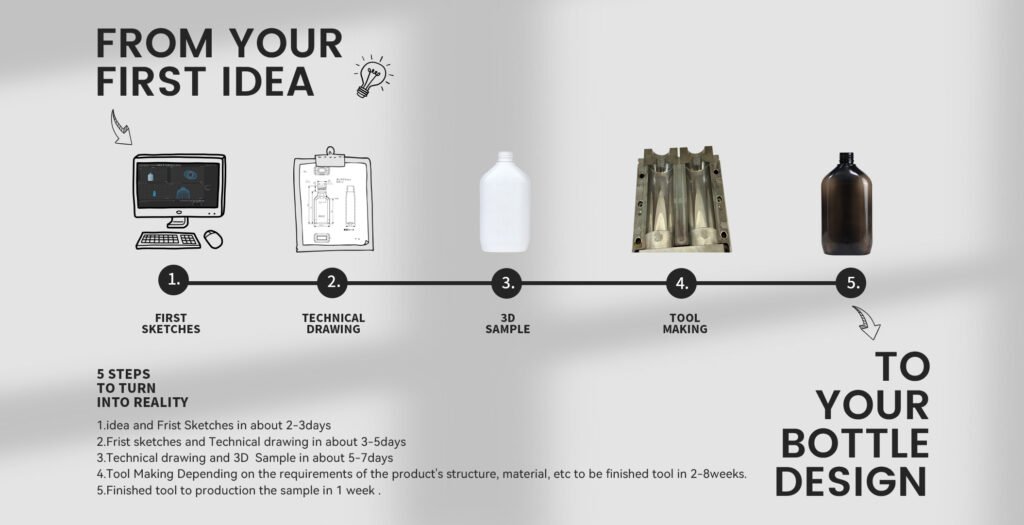
4.What Is the Mold Development Process? From Idea to Final Product
Many people think mold development is simply:
“Give the factory a design → pay for the mold → receive the final mold.”
But that’s far from reality.
Mold development is a full engineering workflow.
Any unclear step can lead to delays, rework, or even starting over.
Here is the real, complete process used in the packaging industry:
① Requirement Confirmation
This is the most important communication stage.
The factory needs to understand:
Capacity — 30ml? 50ml? 120ml?
Material — PP, PET, PETG, AS, Acrylic?
Appearance — round shoulder, square, thick-wall, soft curves, sharp edges
Structure — inner cup? overshell? airless pump? screw cap?
Functional expectations — tightness, pump smoothness, drop test requirements
The clearer the requirement, the smoother the entire project will go.
② Industrial Design (ID) & 3D Appearance Modeling
This stage determines whether the bottle “looks good”:
ID sketch / concept rendering
3D model for appearance (not structural yet)
Proportions, curves, angles, silhouette
Confirm the design language
At this stage, the output is visually correct but not necessarily moldable.
③ Engineering Structure Evaluation (Extremely Important)
This stage bridges the design with actual manufacturability:
Check wall thickness (too厚 = sink marks; too thin = deformation)
Ensure proper draft angle for demolding
Check undercuts (倒扣) and slider requirements
Review thread design / cap engagement structure
Confirm material feasibility
Evaluate mold flow and potential shrinkage
Over 90% of delays come from mismatches between design and engineering structure.
④ Mold Design (Mold Engineering Stage)
Now the mold engineers create the actual mold structure:
Core & cavity design
Slider & lifter design (to solve undercuts)
Cooling system layout
Ejector pins & ejector plate design
Gate location & runner system
Cavity number (single or multi-cavity)
This stage determines whether the mold will be:
durable
stable
precise
expensive or economical
This is the true “engineering brain” of the project.
⑤ CNC Machining & Mold Assembly
This is the physical process of making the mold:
Rough cutting
CNC precision machining
EDM (electric discharge machining)
Polishing
Assembling the mold base
Installing sliders and alignment components
Each part determines the final product’s:
gloss
clarity
precision
consistency
⑥ First Trial (T0 Sample)
The first sample from the mold — usually not perfect:
Check shrinkage
Check wall thickness uniformity
Check deformation / sinking / flash
Evaluate thread engagement
Test cap fit / pump fit
Visual quality check
The purpose of T0 is to find problems, not to be perfect.
⑦ T1 / T2 Adjustments & Fine-tuning
Mold engineers adjust the mold repeatedly:
Fix dimensional errors
Improve thread matching
Enhance surface quality
Adjust cooling channels
Re-run samples after each modification
The more complex the structure, the more T-runs required.
⑧ Small-batch Trial Production
A real test of mold stability:
Usually 1,000–3,000 pcs
Test continuous production
Check injection stability
Confirm tolerance consistency
Drop test / stress test (if needed)
This stage ensures the mold is ready for mass production.
⑨ Mass Production
Once the mold runs smoothly:
Formally enter large-scale production
Quality control standards established
Packaging + assembly plan confirmed
Start preparing for full shipment
Only at this point is the mold truly “complete.”
5.How Long Does Mold Development Take? Realistic Timelines
There is no single, fixed answer for how long mold development takes.
The timeline depends on far more than “how fast the factory works.”
In reality, the biggest factors are:
Whether the design changes repeatedly
Whether engineering structure is confirmed early
Whether the part requires sliders, lifters, or complex engagement
Whether the chosen material is difficult to process (e.g., Acrylic takes longer than PP)
Below is a realistic industry reference for typical mold timelines.
📌 Typical Mold Development Timelines
| Mold Type | Complexity | General Timeline | Notes |
|---|---|---|---|
| Injection mold (caps, covers, small parts) | Simple | 15–20 days | Basic structure, no slider |
| Medium | 20–30 days | Common cosmetic caps or outer shells | |
| Complex | 35–50 days | Multi-slider, locking structures, thick-wall parts | |
| Blow mold (PET/PE bottles) | Medium | 20–30 days | Standard bottle designs |
| Complex | 30–45 days | Special shapes or high wall-thickness requirements | |
| Acrylic / AS molds | Mid-high | 30–50 days | Clear materials require higher precision and polishing |
| Pump molds (most complex) | High | 45–90 days | Many components + extreme dimensional tolerance |
| Full bottle set (bottle + inner cup + overshell + cap) | High | 60–120 days | Multiple molds run in parallel; coordination takes time |
Why These Timelines Matter
The actual machining time is often not the bottleneck.
The true delays come from:
Changing appearance design too late
Revising structure during mold design
Unclear requirements for fit, wall thickness, or tolerance
Unrealistic expectations about sample perfection on the first trial
Good front-end communication saves far more time than rushing machining.
6.Common Pitfalls in Mold Development (Most Brands Fall Into These)
① Endless design changes = mold can never start
Many brands finalize the appearance first but skip engineering review, leading to repeated revisions:
Curve changed → mold redesign
Undercut added → need a slider
Thickness changed → CNC redo
Constant design updates delay the mold more than anything else.
② The design looks good — but cannot be molded at all
Common issues:
Wall thickness too uneven
Insufficient draft angle
Thread structure not feasible
Poor tolerance between inner/outer parts
Shrinkage not considered
Designers can draw anything. Engineers cannot produce anything.
③ Ignoring compatibility of pump, cap, and thread
After the bottle mold is finished, brands often find:
Thread is not standard → accessories don’t fit
Pump doesn’t lock tightly → leakage
Cap doesn’t align → bad user experience
If the neck is wrong, the whole project fails.
④ Expecting T0 or T1 samples to be perfect
Reality:
T0 = flaw detection
T1 = early shape
T2 = close to final quality
Many brands panic at T0 quality, but that’s exactly its purpose.
⑤ No tolerance planning = inconsistent mass production
Different batches = different shrinkage.
Without tolerance:
Some batches too tight
Some too loose
Some threads don’t engage
No tolerance = guaranteed trouble.
7.Who Should Consider Mold Development? Which Brands Is It Actually Worth It For?
Not every brand should develop a custom mold.
Mold development requires time, money, and long-term planning — it’s not just about looking unique.
Here are the situations where mold development is truly worth it:
① You have a long-term product plan and stable hero SKUs
If a product will stay in your line for years,
a custom mold becomes a real asset instead of a cost.
② Your brand is entering a more mature, differentiated stage
When you want to:
Avoid common stock bottle shapes
Build recognizable design language
Compete with more premium brands
A custom mold creates immediate differentiation.
③ You sell high-margin products that can support mold cost
Such as:
Serums
Face creams
Anti-aging lines
High-concentration actives
Higher margins make mold investment realistic.
④ You need exclusive structure or functional components
For example:
Refillable inner cups
Special locking systems
Integrated pumps
Anti-backflow designs
Unique filling structures
These cannot be done with stock bottles.
⑤ You are designing for IP collaborations or seasonal gift sets
Limited editions benefit significantly from unique bottle shapes.
When mold development is NOT recommended
① When your sales are unstable or you are testing the market
Too risky. Too early.
② When your launch pace is very fast or SKU count is high
Custom molds slow the process; stock packaging works better.
③ When your budget is limited and the product price is low
For large-volume categories (shampoo, body wash, etc.)
✔ Stock bottles are more cost-effective
✘ Custom molds rarely pay off
8.How to Reduce Mold Development Risk
| Risk Point | Why It Causes Problems | How to Avoid It (Practical Actions) |
|---|---|---|
| ① Doing appearance design first → endless revisions later | A beautiful appearance ≠ a moldable structure. If the structure doesn’t match the design, wall thickness, curves, and undercuts must be repeatedly revised. | After the appearance is done, immediately run engineering evaluation to confirm wall thickness, draft angle, tolerances, and undercuts. |
| ② Ignoring neck standards → pumps/caps don’t match | Non-standard threads, mismatched locking structures, loose pumps, and leaking issues lead to redoing every accessory. | Confirm early: thread standard + cap engagement + pump compatibility + filling requirements. |
| ③ No tolerance planning → inconsistent mass production | Different material batches and temperature changes cause shrinkage. Without tolerance, products will be too tight or too loose. | All dimensions must include tolerance: e.g., Ø32 ± 0.2mm, not a fixed number. |
| ④ Expecting T0 samples to be perfect → project stuck | T0 is for identifying defects, not final quality. Expecting perfection leads to endless redesigns and delays. | Accept the normal process: T0 = defect check → T1 = refinement → T2 = near-production quality. |
| ⑤ Choosing a factory without experience in similar structures | Thick-wall acrylic, multi-slider parts, double-layer structures, or pumps require experience. Inexperienced factories struggle. | Always choose factories that have done similar structures before — this matters more than price. |
| ⑥ Unclear early communication → cost and timeline spiral out of control | The vaguer the requirements, the higher the risk. Late-stage changes are always the most expensive. | Before mold development begins, confirm appearance + structure + material + tolerance + accessory compatibility all at once. |
9.The Core Logic Behind Mold Development
Mold development may sound technical, but the core logic is actually very simple:
① A mold isn’t for making something “beautiful”—it’s for making something long-term and repeatable.
If the product won’t stay in your line, it’s not worth the investment.
② A mold is not a one-time purchase. It’s an engineering workflow.
Each stage — design, structure review, T0/T1/T2 trials, tuning, and production — affects cost, timing, and final quality.
③ The clearer the early communication, the fewer revisions and delays you’ll face.
Most problems come from unclear requirements, not technical issues.
So the real decision boils down to three questions:
Will this SKU stay long-term?
Does my brand need differentiation?
Can I support the budget and timeline?
If yes → A custom mold becomes a real competitive asset.
If no → Stock packaging is faster, cheaper, and more reliable.